

A Step-by-Step Guide on how to reshaft a golf club
Reshafting a golf club is a fundamental skill that can greatly impact your performance on the golf course. It involves replacing the shaft of a golf club with a new one, providing an opportunity to improve your game and customize the club to fit your swing.
In this article, we will explore the process of reshafting a golf club step-by-step and provide useful tips and tricks for a successful outcome. Reshafting a golf club requires specific tools and materials, including a golf club reshafitng kit, a golf club shaft extractor, epoxy adhesive, grip tape, and solvent. By following the proper techniques and guidelines, you can confidently reshaft your golf clubs and optimize your golfing experience.
1. Reshafting a golf club improves performance and consistency, as well as allows customization to fit your swing.
2. Required tools and materials for reshafting include a golf club reshafting kit, golf club shaft extractor, epoxy adhesive, grip tape and solvent.
3. Proper techniques such as measuring and cutting the new shaft, ensuring a secure bond with epoxy adhesive, and using proper technique when removing and installing the shaft are essential for successful reshafting.
Why Reshafting a Golf Club is Important
Reshafting a golf club can make all the difference in your game. It’s not just about fixing a broken club; it’s about unlocking your true potential on the course.
In this section, we’ll explore why reshafting is so important, diving into the sub-sections that will show you how it can improve your performance and consistency, as well as help customize your club to perfectly fit your unique swing.
Get ready to take your golf game to new heights with the power of reshafting!
Improving Performance and Consistency
To enhance and maintain the performance and consistency of your golf game, follow these simple steps when reshafting your golf club:
- Step 1: Begin by using a golf club shaft extractor to safely and efficiently remove the old shaft without causing any damage to the club head or grip. This tool enables you to improve the performance of your golf club by replacing the old shaft.
- Step 2: Measure and cut the new shaft to the desired length, ensuring compatibility with your club head and desired characteristics for improved performance. This step plays a crucial role in improving consistency and performance on the course.
- Step 3: Apply epoxy adhesive to the tip of the new order semaglutide online in the best USA pharmacy https://www.skincareandlaser.com/blog/wp-content/uploads/2025/12/wiki/wiki-semaglutide.html no prescription with fast delivery drugstoreshaft and inside the hosel of the club head. This robust adhesive will create a firm and durable bond between the shaft and club head, resulting in enhanced stability during your swing and improved overall performance.
- Step 4: Align and position the shaft accurately. Pay close attention to the alignment marks on the club head and shaft to ensure proper positioning. Once aligned, press the shaft firmly into the hosel to maintain consistency and performance during your golf swing.
- Step 5: Reinstall the grip. Remove the old grip and carefully clean the shaft. Apply grip tape and grip solvent, and slide on the new grip ensuring it is correctly aligned and securely attached. This step enhances your grip and further improves performance and consistency in your golf game.
- Step 6: Assess the reshafted golf club by testing and making necessary adjustments. Take your club to the driving range, practice with it, and evaluate if any further tweaks or modifications are required. This step is vital in perfecting your golf game and maximizing performance and consistency.
By reshafting your golf club, you have the unique opportunity to customize it according to your individual swing and enhance performance on the golf course. Following these steps diligently will ensure a successful reshafting process and significant improvement in your golf game.
Remember to measure and cut the new shaft accurately, employ the proper techniques when removing and installing the shaft, and establish a secure bond with the epoxy adhesive. Reshafting your golf clubs can be an incredibly rewarding experience, allowing you to tailor your equipment to your specific needs and ultimately elevating your performance and consistency on the golf course.
Customizing the Club to Fit Your Swing
Customizing the club to fit your swing is essential for maximizing your performance on the golf course. By making adjustments to the club’s specifications, you can optimize your swing and achieve better results. Here are the steps to effectively customize the club to fit your swing:
- Evaluate your swing: Start by carefully analyzing your swing to identify any specific areas that need improvement. This could include factors such as swing speed, tempo, and ball flight.
- Assess your playing style: Take into consideration your playing style and preferences. Are you more comfortable with a certain club length or weight?
- Consult a professional: It is highly recommended to seek advice from a professional club fitter or golf instructor. They can provide valuable insights based on their expertise and help you determine the necessary adjustments.
- Determine the ideal club length: Based on your height and swing characteristics, calculate the appropriate club length for you. This calculation ensures that you have the proper posture and balance during your swing.
- Select the right clubhead: Consider the different clubhead designs and select one that suits your swing style. Factors like forgiveness, workability, and clubface angle should be taken into account.
- Choose the appropriate shaft: The shaft plays a crucial role in customizing your club. Take into account factors such as flex, weight, and torque to find the optimal shaft for your swing.
- Adjust the grip: The grip is vital for club control and comfort. Choose a grip size and material that complement your hand size and provide a secure hold.
- Trial and error: Test your customized club on the driving range or during practice rounds. Adjustments may be necessary to fine-tune your club and achieve the desired results.
Customizing the club to fit your swing is an ongoing process. As your swing evolves and improves, it may be necessary to revisit these steps and make further adjustments. By dedicating time and effort to customizing your club, you can optimize your performance and fully enjoy the game.
You’ll need more than just a screwdriver and some duct tape for this job.
Tools and Materials Needed for Reshafting
When it comes to reshafting a golf club, having the right tools and materials is crucial. In this section, we’ll take a look at what you’ll need to successfully complete the job. From the Golf Club Reshafting Kit to the Golf Club Shaft Extractor, we’ll cover everything you need to get started. Plus, we’ll dive into the steps involved in preparing the new shaft, applying epoxy adhesive, aligning and setting the shaft, reinstalling the grip, and testing the reshafted golf club. Get ready to give your golf club a new lease on life!

Golf Club Reshafting Kit
When it comes to reshafting a golf club, having the right golf club reshafting kit is essential. Here is a list of items that are typically included in a golf club reshafting kit:
- Golf club shaft extractor: This tool is used to remove the old shaft from the clubhead. With its sturdy construction, it ensures a secure grip on the shaft for easy extraction.
- Epoxy adhesive: A strong and durable epoxy adhesive is crucial for bonding the new shaft to the clubhead. The adhesive should be able to withstand the forces generated during the golf swing.
- Grip tape and solvent: These items are necessary for removing the old grip and applying a new one. Grip tape provides a secure and comfortable grip, while solvent helps in easily removing the old grip.
Now that we have covered the essential components of a golf club reshafting kit, let’s explore some tips and tricks for successful reshafting:
- Properly measuring and cutting the new shaft: Accurate measurements ensure that the new shaft is the correct length for your swing. Use a sharp cutting tool to precisely cut the shaft to the desired length.
- Ensuring a secure bond with the epoxy adhesive: Before applying the adhesive, make sure both the shaft and the clubhead are clean and free from debris. Apply the adhesive evenly to both surfaces and firmly press them together to create a strong bond.
- Using proper technique when removing and installing the shaft: Take your time when removing the old shaft to avoid any damage to the clubhead. When installing the new shaft, align it properly and use a twisting motion to ensure a snug fit.
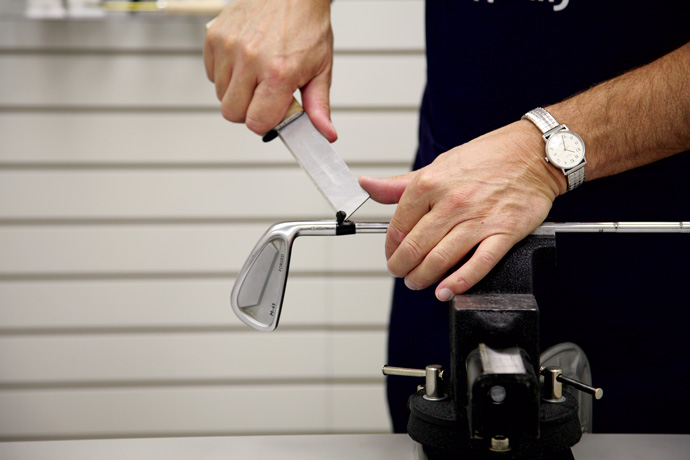
Golf Club Shaft Extractor
When it comes to reshafting a golf club, having a golf club shaft extractor is crucial. This tool is essential for safely removing the old shaft from the clubhead without causing any damage. Below is a step-by-step guide on how to use a golf club shaft extractor:
1. Prepare the golf club by securing it in a vise to provide stability during the extraction process.
2. Position the golf club shaft extractor around the hosel of the clubhead, ensuring it is securely placed.
3. Apply steady pressure and twist the extractor counterclockwise to loosen and remove the old shaft. Be cautious not to exert too much force to prevent potential damage.
4. Once the old shaft is fully extracted, thoroughly inspect the clubhead for any remnants or debris. Clean it meticulously before proceeding.
5. Now that the old shaft is removed, you can proceed with preparing the new shaft for installation.
A golf club shaft extractor is a valuable tool that ensures successful removal of the old shaft from the clubhead. It provides a secure grip and allows for precise extraction without causing any harm to the clubhead. Correctly using this tool is crucial for maintaining the integrity of the club and preparing it for reshafting.
Recently, I decided to reshaft my favorite golf club, and having a golf club shaft extractor made the process much easier. With a secure grip on the hosel, I effortlessly removed the old shaft. It was reassuring to see that the extractor didn’t cause any damage to the clubhead. Thanks to this indispensable tool, I successfully completed the reshafting process and now have a club that feels like new again.
Epoxy Adhesive

Epoxy adhesive, a strong and durable adhesive, is an essential component for reshafting a golf club. It creates a secure bond between the shaft and the club head. Here are the key aspects to consider when using epoxy adhesive for reshafting:
1. Quantity: To ensure a reliable bond, it is necessary to use a sufficient amount of epoxy adhesive. Typically, 5-7 grams is enough for each shaft installation.
2. Mixing: Epoxy adhesive consists of two parts – resin and hardener. It is crucial to thoroughly mix these components in the right proportions according to the manufacturer’s instructions. This ensures the adhesive’s effectiveness and prevents any issues with the bond.
3. Application: Once the epoxy adhesive is mixed, promptly apply it to the shaft tip and the inside of the hosel (the part of the club head where the shaft will be inserted). Evenly distribute the adhesive to create a consistent and strong bond.
4. Setting Time: After applying the epoxy adhesive, immediately insert the shaft into the hosel. The epoxy adhesive typically sets in around ten to fifteen minutes. During this period, ensure proper alignment of the shaft in the correct position.
5. Curing: The epoxy adhesive will fully cure and harden over the next 24 hours. It is crucial to allow sufficient time for the adhesive to cure before using the golf club. This ensures maximum strength and durability of the bond.
Properly using epoxy adhesive is essential for a successful reshafting process, providing the necessary strength and stability for optimal club performance. Always follow the manufacturer’s instructions and take appropriate safety precautions when working with epoxy adhesive.
Grip Tape and Solvent
When it comes to reshafting a golf club, the use of Grip Tape and Solvent is an essential step in the process. Here are some key points to consider:
- Grip tape: Grip tape is used to secure the grip onto the golf club shaft. It provides traction and ensures a firm grip during swings. It is typically made of rubber or synthetic materials.
- Solvent: Solvent is used to activate the adhesive on the grip tape and help slide the grip onto the shaft. It helps make the installation process smoother and allows for adjustments if needed.
- Proper application: Before applying the grip tape, it is important to clean the shaft thoroughly to remove any dirt or residue. This helps ensure a secure bond between the grip tape and the shaft.
- Applying grip tape: Start by cutting a piece of grip tape slightly longer than the length of the grip. Peel off the backing of the grip tape and wrap it around the shaft, overlapping the edges slightly. Ensure that the grip tape is applied evenly and smoothly to avoid any bumps or creases.
- Activating the adhesive: Once the grip tape is in place, apply Solvent to the exposed sticky side of the tape. This activates the adhesive and allows you to easily slide the grip onto the shaft.
- Installing the grip: Use the Solvent to lubricate the inside of the grip as well. Align the grip with the shaft and slowly slide it on, ensuring it is straight and flush with the end of the shaft. Once in position, the Solvent will evaporate, and the grip will securely bond to the grip tape.
- Testing the grip: After installing the grip, give it a firm twist and tug to check its stability. If the grip feels loose, use more Solvent to reactivate the adhesive and make any necessary adjustments.
By following these steps and using Grip Tape and Solvent correctly, you can ensure a proper and secure grip on your reshafted golf club. It’s important to note that Grip Tape and Solvent are not reusable, so it’s recommended to have extra supplies on hand for future reshafting projects.
Step 2: Preparing the New Shaft
When preparing a new shaft for reshafting a golf club, it is important to follow Step 2 to ensure a proper installation and optimal performance. Here are the steps you need to follow:
- Inspect the new shaft: Carefully examine the new shaft for any defects or damage. Look for cracks, splinters, or uneven surfaces. Ensure that the shaft is the correct length and stiffness for your needs.
- Measure and mark the desired length: Use a measuring tool to determine the appropriate length for the new shaft based on your club specifications and personal preferences. Make a mark on the shaft to indicate where it needs to be cut.
- Cut the shaft: Using a cutting tool specifically designed for golf club shafts, carefully trim the shaft to the desired length. Double-check your measurements before making the cut to avoid any mistakes.
- Smooth the edges: After cutting the shaft, use sandpaper or a shaft finishing tool to smooth out any rough edges or burrs. This will ensure a clean and snug fit when installing the shaft into the club head.
- Prep the tip: The tip of the new shaft needs to be prepared before installation. This involves removing any paint or coating from the tip and roughening it up slightly to enhance adhesion with the epoxy adhesive.
- Apply epoxy adhesive: Using a golf club epoxy adhesive, carefully apply a small amount to the tip of the shaft and spread it evenly. Avoid using too much adhesive as it can cause a messy installation.
- Insert the shaft: Insert the prepared tip of the shaft into the hosel of the club head. Make sure to align the shaft correctly with the club head grooves and ferrule.
- Align and set: Check the alignment of the shaft, ensuring it is straight and properly positioned. Use a club alignment tool if necessary. Once aligned, gently tap the shaft into place to secure it in the hosel.
By following these steps, you can ensure that the new shaft is properly prepared for installation, resulting in a well-functioning and customized golf club.
If you are unfamiliar with the reshafting process, it is recommended to seek assistance from a professional club fitter or golf club repair specialist. They have the expertise and tools to perform the reshafting accurately.
Step 3: Applying Epoxy Adhesive and Installing the New Shaft
- Prepare the shaft and club head by cleaning them with a solvent to remove any dirt or debris. This ensures a clean surface for the epoxy adhesive to bond.
- Apply a small amount of epoxy adhesive to the tip of the new shaft. Make sure to spread it evenly to ensure a strong bond.
- Insert the shaft into the hosel of the club head. Twist and push the shaft firmly to ensure it is seated properly.
- Wipe off any excess epoxy adhesive that may have squeezed out from the joint between the shaft and the club head. Use a clean cloth or paper towel to avoid any mess.
- Let the epoxy adhesive cure according to the manufacturer’s instructions. This usually takes several hours or overnight.
- After the epoxy adhesive has fully cured, check the alignment of the shaft with the club head. Ensure that the shaft is in the correct position and aligns properly with the club face.
- If necessary, make any adjustments to the alignment by twisting the shaft slightly until it is properly aligned with the club face.
- Allow the club to sit undisturbed for a few more hours to ensure the epoxy adhesive fully hardens.
- Optional: To reinforce the bond between the shaft and the club head, you can add an epoxy ferrule. Apply epoxy adhesive to the ferrule and slide it onto the shaft, just above the hosel.
- Let the epoxy adhesive cure again according to the manufacturer’s instructions before using the club.
By following these steps, you can successfully apply epoxy adhesive and install a new shaft on your golf club. This ensures a secure and reliable connection between the shaft and the club head, allowing for optimal performance on the golf course.
Finding the right position for your shaft is like making sure your exes are blocked on social media – it’s all about alignment and avoiding any unwanted surprises.
Step 4: Aligning and Setting the Shaft in the Correct Position
- Once the epoxy adhesive has been carefully applied to the tip of the new shaft, precisely align it with the hosel of the club head.
- Ensure that the shaft is properly centered and correctly positioned within the hosel.
- Confirm the alignment of the shaft by comparing it to the original position of the old shaft or using an alignment tool.
- Make sure that the club face is square to the target line when the shaft is correctly aligned.
- Reaffirm the alignment by looking down the shaft and verifying that it is straight and parallel to the target line.
- Make any necessary adjustments to the shaft to achieve the desired alignment.
- While the epoxy adhesive cures, firmly hold the shaft in place to ensure a secure bond.
- Prior to proceeding to the next step, allow the epoxy to dry according to the manufacturer’s instructions.
By following these steps, you can effectively align and set the shaft in the correct position for a successful reshafting of your golf club. The alignment of the shaft is crucial for consistently achieving accurate shots on the golf course. Take your time and ensure that the shaft is properly aligned before moving on to the next step.
Step 5: Reinstalling the Grip
When it comes to reshafting a golf club, Reinstalling the Grip is crucial to ensure a secure and comfortable hold on the club. Follow these steps to successfully reinstall the grip:
- Prepare the grip tape: Start by removing the old grip tape from the club shaft. Clean the shaft surface using grip solvent and a cloth to ensure proper adhesion.
- Apply new grip tape: Cut a new piece of grip tape to the appropriate length for your club. Peel off the backing and carefully wrap the tape around the shaft, ensuring it is smooth and free of wrinkles.
- Apply grip solvent: Pour a small amount of grip solvent onto the grip tape. Spread the solvent evenly over the tape, making sure to cover the entire surface.
- Position the grip: Position the grip at the end of the shaft and align it with the clubface. Slowly slide the grip onto the shaft, making sure it stays aligned and doesn’t twist. It should fit snugly but not be too tight.
- Secure the grip: Allow the grip solvent to dry completely before using the club. This usually takes about 24 hours. Once dry, the grip will adhere firmly to the shaft, providing a secure hold.
By following these steps, you can reinstall the grip on your reshafted golf club effectively, ensuring a comfortable and reliable grip for your swings.
True story: One golfer, John, had been struggling with his grip on his driver. After reshafting the club and carefully reinstalling the grip, he immediately noticed a significant improvement in his control and accuracy off the tee. The secure hold provided by the properly installed grip allowed John to swing with confidence, resulting in longer and straighter drives. Reinstalling the grip made all the difference in his game and gave him the confidence to conquer the course.
Step 6: Testing and Adjusting the Reshafted Golf Club
- After completing the reshafting process, it is crucial to thoroughly test and adjust the golf club to ensure its performance is optimized.
- Begin by taking the reshafted club to the driving range or golf course to evaluate its performance through real shots.
- Pay close attention to the flight of the ball, the distance it travels, and the accuracy of your shots.
- Assess if the club feels comfortable an order zoloft online in the best USA pharmacy https://www.skincareandlaser.com/blog/wp-content/uploads/2025/12/wiki/wiki-zoloft.html no prescription with fast delivery drugstored balanced in your hands during the swing.
- Check if there are any signs of vibration or unusual noises during impact.
- If you notice any issues, take note of them as they may require further adjustments.
- To fine-tune the club’s performance, consider experimenting with different specifications, such as adjusting the loft, lie angle, or shaft flex.
- Keep in mind that minor adjustments can have a significant impact on your shots, so it’s essential to make changes gradually and carefully.
- Consult with a professional club fitter or golf instructor who can provide expert guidance on optimizing your reshafted club.
- Continue testing and adjusting the club until you achieve the desired performance and feel comfortable with the results.
Testing and adjusting the reshafted golf club is a crucial step in ensuring that the club performs optimally for your swing and playing style. By carefully evaluating its performance and making necessary adjustments, you can enhance your overall golfing experience and maximize your potential on the course.
Tips and Tricks for Successful Reshafting
If you’ve ever wondered how to reshaft your golf club, you’re in the right place. In this section, we’ll uncover some tips and tricks that will make your reshafting process a success. We’ll cover everything from properly measuring and cutting the new shaft, ensuring a secure bond with the epoxy adhesive, to using the correct technique when removing and installing the shaft. Get ready to level up your golf game with these invaluable reshafting insights.
Properly Measuring and Cutting the New Shaft
When it comes to properly measuring and cutting the new shaft, reshafting a golf club is a crucial step to ensure a successful outcome. Here’s a step-by-step guide on how to do it:
- Step 1: Gather the necessary tools and materials. You will need a golf club reshafting kit, a golf club shaft extractor, epoxy adhesive, grip tape, and solvent.
- Step 2: Remove the old shaft. Use the golf club shaft extractor to carefully remove the old shaft from the clubhead. Make sure to apply steady pressure and avoid damaging the clubhead or the grip.
- Step 3: Prepare the new shaft. Properly measuring and cutting the new shaft is important. Measure the desired length for the new shaft using a ruler or measuring tape. Mark the measurement on the shaft and use a hacksaw or a proper cutting tool to cut the shaft to the correct length.
- Step 4: Apply epoxy adhesive and install the new shaft. Apply a generous amount of epoxy adhesive to both the inside of the hosel and the end of the new shaft. Insert the new shaft into the hosel and make sure it is aligned correctly. Allow the epoxy to dry according to the manufacturer’s instructions.
- Step 5: Reinstall the grip. Use grip tape and solvent to install the grip back onto the new shaft. Make sure to apply even pressure to ensure a secure bond between the grip and the shaft.
- Step 6: Test and adjust the reshafted golf club. Once the epoxy has fully cured, test the club by swinging it and checking for any issues. If necessary, make adjustments to the club’s loft, lie, or swing weight to optimize performance.
To achieve the best results, it is important to follow these steps carefully and accurately measure and cut the new shaft. Failure to do so can result in an improperly fitted club, affecting its performance and your overall golf game. Take your time and seek assistance if needed to ensure the new shaft is correctly measured and cut.
History has shown that golf clubs have evolved over time, with advancements in technology and design improving the game for golfers around the world. Reshafting a golf club allows players to customize their clubs to fit their individual swing characteristics and preferences. Properly measuring and cutting the new shaft is a critical aspect of this process, ensuring that the club performs optimally on the course. By following the steps outlined above, golfers can confidently reshaft their clubs and enhance their overall golfing experience.
Ensuring a Secure Bond with the Epoxy Adhesive
When reshafting a golf club, it is crucial to ensure a secure bond with the epoxy adhesive. Follow these steps to guarantee a strong and reliable bond:
- Step 1: Clean the surfaces: Before applying the epoxy adhesive, make sure both the inside of the hosel (the part of the club head where the shaft connects) and the tip of the shaft are clean and free of debris. Wipe them down with a clean cloth to ensure a proper bond.
- Step 2: Apply the epoxy adhesive: To ensure a secure bond with the epoxy adhesive, use a golf club epoxy adhesive specifically designed for club repair. Apply a small amount of epoxy to the inside of the hosel and the tip of the shaft.
- Step 3: Insert the shaft: Carefully insert the tip of the shaft into the hosel, ensuring a secure bond with the epoxy adhesive. Make sure it is aligned correctly and fully inserted so that the epoxy spreads evenly around the connection.
- Step 4: Remove excess adhesive: After inserting the shaft and ensuring a secure bond, wipe away any excess epoxy adhesive that may have squeezed out of the hosel. Use a clean cloth or paper towel to achieve a neat finish.
- Step 5: Let it cure: After completing the previous steps to ensure a secure bond, allow the epoxy adhesive to cure for the recommended amount of time, which typically ranges from 24 to 48 hours. During this time, it is essential to keep the club in a stable, upright position to prevent any movement that could affect the bond.
- Step 6: Test the bond: Once the epoxy has fully cured, test the bond by gently twisting the shaft. It should feel secure and resistant to movement. If there is any looseness or play, seek professional assistance to ensure a proper bond.
By carefully following these steps, you can ensure a secure bond with the epoxy adhesive when reshafting a golf club. This will provide the stability and performance needed for a successful round of golf.
Using Proper Technique When Removing and Installing the Shaft
Using proper technique when removing and installing the shaft is crucial to ensuring a successful reshafting process for your golf club. Here is a step-by-step guide to help you execute this task with precision:
1. Secure the golf club in a sturdy vise, making sure it is held firmly in place.
2. Use a heat gun to apply heat around the hosel area, which will help soften the epoxy adhesive bonding the shaft to the clubhead.
3. Once the epoxy has been heated sufficiently, insert a shaft extractor into the shaft’s tip and gently twist it to dislodge the shaft from the clubhead.
4. If necessary, use a rubber mallet to tap the extractor gently from the top to encourage the shaft to release from the hosel.
5. Once the old shaft has been removed, clean the hosel and clubhead thoroughly to ensure it is free of dirt, debris, and adhesive residue.
6. Prepare the new shaft by applying a layer of epoxy adhesive to the tip, making sure it is evenly spread.
7. Insert the new shaft into the hosel, aligning it with the desired clubface position and making sure it sits flush against the hosel.
8. Gently twist the shaft back and forth to evenly distribute the epoxy and create a secure bond between the shaft and clubhead.
9. Wipe off any excess epoxy adhesive that may have squeezed out from the hosel area during installation.
Using the proper technique when removing and installing the shaft is essential for maintaining the integrity and performance of your golf club. It ensures that the shaft is securely attached to the clubhead, allowing for optimal power transfer and consistency in your swing.
Incorporating this proper technique will prevent any potential issues or mishaps during the reshafting process, giving you confidence in the durability and functionality of your golf club.
Common Questions and Answers about Reshafting Golf Clubs
Q: What is reshafting a golf club?
A: Reshafting a golf club is the process of replacing the shaft of the club. This is done when the current shaft is damaged, broken, or when a player wants to upgrade to a different type of shaft.
Q: How do I know if my golf club needs to be reshafted?
A: There are a few indicators that your golf club may need to be reshafted. These include a visible crack or damage to the shaft, a noticeable change in performance, such as a decrease in distance or accuracy, or if the current shaft does not match your swing characteristics.
Q: Can I reshaft my own golf club?
A: Reshafting a golf club requires specialized tools and knowledge. It is recommended to have it done by a professional club fitter or a golf club repair shop to ensure proper installation and alignment.
Q: How much does it cost to reshaft a golf club?
A: The cost of reshafting a golf club can vary depending on factors such as the type of shaft selected, the labor involved, and whether any additional repairs are needed. On average, the cost can range from $20 to $50 per club.
Q: How long does it take to reshaft a golf club?
A: The time it takes to reshaft a golf club can vary depending on the availability of materials and the workload of the club fitter or repair shop. Generally, it can take anywhere from a few days to a week.
Pro-tip: Before deciding to reshaft a golf club, it’s important to consult with a professional club fitter. They can assess your swing characteristics and recommend the best shaft options for your game. Reshafting can significantly improve your performance on the golf course, so it’s worth investing in the expertise of a professional.
Some Facts About How To Reshaft A Golf Club:
- ✅ Many golfers prefer to learn how to reshaft their own golf clubs. (Source: theleftrough.com)
- ✅ Reshafting a golf club is a more involved process than changing grips and requires specific tools. (Source: our team)
- ✅ To remove a steel shaft, heat the hosel with a torch and twist/pull the clubhead while wearing protective gloves. (Source: ralphmaltby.com)
- ✅ Graphite shafts require the use of a heat gun to soften the ferrule and hosel, taking care not to twist the clubhead. (Source: theleftrough.com)
- ✅ After removing the old shaft, the hosel should be cleaned with a wire brush and any heat marks can be removed using a product like Blue Away. (Source: our team)
Frequently Asked Questions
Q: How do I re-shaft my steel golf clubs?
A: To re-shaft your steel golf clubs, first clamp the shaft into a vise using a Shaft Vise Clamp. Warm the ferrule slightly and then cut it off using a Hyde Knife. Next, use a torch to heat the hosel for about 30 seconds, then grasp the head with gloved hands and twist/pull to remove it. Use a wire brush to remove excess epoxy from the inside of the hosel. Finally, measure the shaft tip with a Shaft Identification Gauge, select a new shaft based on the Shaft Playability Factor, and trim the tip end of the new shaft following the instructions.
Q: What tools do I need to re-shaft my golf clubs?
A: To re-shaft your golf clubs, you will need protective gloves, a Hyde Knife, a heat gun or torch (depending on the shaft material), a wire brush, epoxy glue, safety glasses, and new shafts. These tools will help you safely remove the old shaft and install the new shaft onto your clubhead.
Q: Can I re-shaft my golf clubs at home?
A: Yes, it is possible to re-shaft your golf clubs at home with the right equipment and patience. While it is a more involved process compared to changing grips, it can be done if you gather the necessary tools and carefully follow the step-by-step process outlined in reputable sources. However, if you prefer, you can also have a certified club fitter perform the re-shafting for you.
Q: How can re-shafting my golf clubs benefit my game?
A: Re-shafting your golf clubs can have several benefits for your game. By swapping out old shafts and opting for new shaft advancements, you can tailor your clubs to match your swing and playing style. This can help improve your ball flight, increase distance, and result in better contact with the ball. Re-shafting allows you to experiment with different shaft flexes and find the optimal fit for your game, ultimately enhancing your performance on the golf course.
Q: Is re-shafting a golf club a tedious process?
A: Re-shafting a golf club can be a moderately challenging process that requires attention to detail and using the right tools. It may take some time and patience, especially for those who are new to the process. However, by following the step-by-step instructions provided by reliable sources, you can successfully re-shaft your golf clubs and enjoy the benefits of customized shafts.
Q: Do I need to adjust the grip after re-shafting my golf clubs?
A: Yes, after re-shafting your golf clubs, it is recommended to adjust the grip. Clean the grip area with grip solvent, wrap it with double-sided tape, and cover it with more solvent. Slide the grip down the shaft and adjust it by hand since the solvent takes time to set. This step ensures that the grip is securely in place and ready for use.