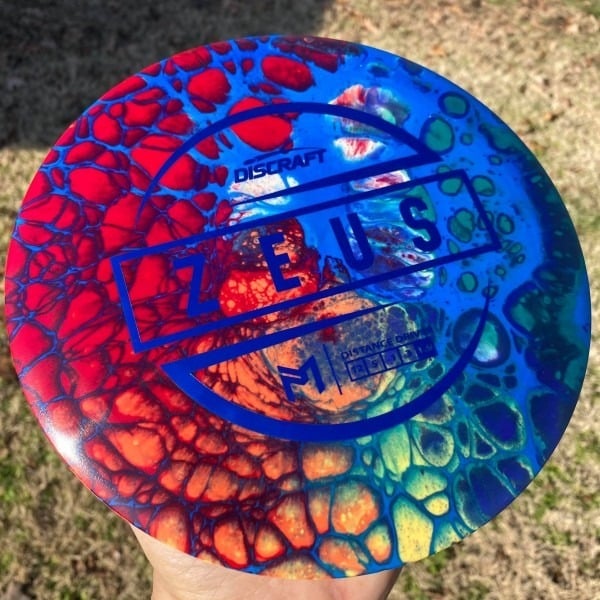
Mastering the Art of Disc Golf Disc Dyeing: A Comprehensive Guide
Key Takeaway:
- The basics of disc dyeing include understanding different techniques and materials needed for the process.
- Popular disc dyeing techniques include the shaving cream method, spin dye method, ice dye method, adhesive vinyl decal/stencil dye, hot glue design, splatter/drip design, and cloth design.
- Step-by-step instructions for disc dyeing involve preparing the disc, choosing and mixing dyes, applying the dye to the disc, allowing the dye to set, and cleaning and finishing the disc.
Introduction
Disc dyeing is a fascinating craft that allows you to add a personal touch to your favorite disc golf discs. In this article, we will explore the basics of disc dyeing and the materials you’ll need to get started. Discover the exciting world of disc dyeing and unleash your creativity onto the discs that accompany you on the course. Let’s dive in and uncover the secrets behind creating stunning and unique designs on your disc golf discs.
The Basics of Disc Dyeing
Disc dyeing is a thrilling process! It allows disc golfers to personalize their discs and make them stand out on the course. Adding color to a disc gives endless possibilities for customizing and showing creativity.

To start, discs must be prepped. Clean with soap and water to remove dirt and oils.
Next, pick and mix the dyes. Player
Then, apply dyes using various methods. Try the shaving cream technique, spin dye method, ice dye method, adhesive vinyl decal/stencil dye method, hot glue design method, splatter/drip design method, or cloth design method. Each technique produces unique effects and patterns.
Let the dye set for the specified time based on the dye used. This ensures the colors stay bright.
Wash off any excess residue with water. To protect the design, apply a clear protective sealant.
Disc dyeing takes practice and experimenting to get the desired results. By following these steps and exploring techniques, disc golfers can unleash their creativity and make stunning designs on their discs. Disc dyeing is just the beginning of a world of customization in disc golf.
Materials Needed for Disc Dyeing
For disc dyeing, grab the essentials! You need:
- dye
- a Discraft Z or Pro plastic disc
- a plastic container
- gloves
Plus, for added effects, you can use:
- paintbrushes
- stencils
- adhesive vinyl decals
- shaving cream
- glue
Get creative and unleash your artistic side! Before you start, make sure all the materials are on hand for a smooth dyeing experience. Now you can spin, splatter, and dye your way to dazzling disc-dyeing perfection!
Popular Disc Dyeing Techniques
Popular Disc Dyeing Techniques: Discover the fascinating world of disc dyeing as we explore the Shaving Cream Method, Spin Dye Method, Ice Dye Method, Adhesive Vinyl Decal/Stencil Dye, Hot Glue Design, Splatter/Drip Design, and Cloth Design. Unleash your creativity and add unique, eye-catching designs to your disc golf discs. Get ready to dive into these various methods and learn how to make your discs truly stand out on the course.
Shaving Cream Method
The Shaving Cream Method is a great way to dye discs. It’s all about using cream and dye to make unique patterns. Follow these steps:
- Pick a disc and prep it for dyeing.
- Put some cream on a flat surface, like a baking sheet or tray.
- Squirt some dye or ink onto the cream in random patterns.
- Use a tool to swirl the colours together. This will make marbled or swirled effects.
- Roll your disc across the cream, evenly.
- Lift the disc and scrape off the excess with a squeegee or scraper.
- Rinse off any residue with cold water until it’s clear.
- Let the dye set according to the instructions.
You can get creative with colours and designs. Different shaving creams may give different results, so test them out before committing. Disc dyeing is popular with disc golfers, but also artists and crafters. They use similar techniques on various surfaces (Reference: ‘Additional Resources and Communities for Disc Dyeing’).
Spin Dye Method
The Spin Dye Method is a popular technique for disc dyeing. This method involves spinning the disc while applying dye to make creative designs.
- Spinning the disc distributes the dye over its surface, making vibrant patterns.
- The spin dye method gives precision in design. The disc’s movement can be changed to create various effects.
- Experienced dyers like this technique for intricate designs.
- It needs careful coordination of the hand movements and disc rotation to get the desired results.
For using the spin dye method, knowing how colors and dyes work together is important. Trying different colors and techniques can create amazing results. The spin dye method produces interesting designs for the course.
Ice Dye Method
The ice dye method is a famous disc dyeing technique. It uses ice to make cool, dynamic designs. Here’s how to do it:
- Prep the Disc: Clean it with soap and water. Get rid of dirt, oils, and other substances.
- Select & Mix Dyes: Pick your colors. Mix them according to instructions.
- Apply Dye: Put the disc on a raised platform or rack. Put ice cubes or crushed ice on top of it. Carefully pour or sprinkle diluted dye onto the ice. Allow enough time for the dye to set in.
With this method, you can make unique patterns. Plus, you can experiment with different dyes and designs. Make your disc a work of art!
Adhesive Vinyl Decal/Stencil Dye
The Adhesive Vinyl Decal/Stencil Dye technique is a hit for disc dyeing. It features adhesive vinyl decals or stencils to create eye-catching designs on the disc’s surface. This method is precise and detailed, making the disc look fantastic!
| Technique | Materials Needed |
|---|---|
| Adhesive Vinyl Decal/Stencil Dye | – Disc golf disc – Adhesive vinyl decals or stencils – Dye solution – Spray bottle – Gloves – Plastic wrap – Sealant spray |
The Adhesive Vinyl Decal/Stencil Dye technique offers a lot of design choices. You can use various shapes and sizes of adhesive vinyl decals or stencils. Complex patterns can be achieved, making this a great option for those seeking special disc designs.
Showcase your creativity with the Adhesive Vinyl Decal/Stencil Dye technique. Design intricate and unique frisbees and impress your friends on the disc golf course. Start experimenting with different designs today! Get ready to stick it to your disc with this hot glue design – it’s like giving your frisbee an awesome tattoo!
Hot Glue Design
The Hot Glue Design technique has many advantages. It’s versatile and allows you to make complex designs. Plus, hot glue can act as a resist and control where the dye goes, giving you sharp designs.
You can also experiment with different textures and layers. By adding multiple layers of hot glue, you can make raised or embossed elements on the disc’s surface for extra depth.
However, this method is not without its drawbacks. It requires patience and precision. Take care when applying hot glue to ensure it adheres properly, with no gaps or bubbles. Practice and experimentation are key to mastering this technique.
If you’re up for a creative challenge, try out Hot Glue Design. With it, you can make unique discs with sharp details and added textures, giving them a one-of-a-kind look like they’ve survived a paintball war. Get ready to get messy!
Splatter/Drip Design
Using Splatter/Drip Design, you can get creative with dye! Tools like brushes, syringes, or spray bottles are used to apply the dye onto the disc. It can be splattered or dripped from above, allowing you to control the intensity and direction of the dye to create amazing designs. Every design is unique and unpredictable.
Factors like the thickness of the dye, color combinations, and desired effect should be taken into account. Each drop of dye is different and can spread differently, depending on how it lands. The speed of application also affects the overall design. Experiment with application techniques and colors for stunning visuals and spontaneous effects. Dye your disc and make your opponents jealous with your vibrant design!
Cloth Design
Cloth design is an exciting way to customize discs. You pick a cloth which absorbs the dye without smudging. Then, you apply the dye solution across the disc with the cloth. Different fabrics create different looks. For example, a fine mesh cloth makes a delicate design, or a coarse fabric for a bolder pattern. You can get creative with adhesive vinyl stencils or hot glue designs too. This technique provides control and versatility, so you can make unique discs that stand out on the course!
Step-by-Step Instructions for Disc Dyeing
Looking to add some artistic flair to your disc golf discs? Look no further! In this step-by-step guide, we will walk you through the process of dyeing your discs. From preparing the disc to choosing and mixing the dyes, applying the dye, allowing it to set, and finally, cleaning and finishing the disc, we’ve got you covered. Get ready to transform your discs into vibrant works of art!
Preparing the Disc
- Preparing the disc for dyeing requires several steps. Start by washing it with warm water and mild soap, then drying it completely.
- Next, select a design or pattern for the dye. Make your own stencil or use pre-made stencils or decals.
- Position & secure the stencil onto the disc surface.
- Mix the desired colors & dilute them according to manufacturer instructions. Consider how colors may interact when mixing.
- Apply the dye with various techniques such as brushing, dripping, or spraying. Ensure an even layer of dye covers all areas.
- Let the dye set & bond with the plastic for several hours or overnight.
- Finally, clean & finish the disc. Remove any excess or residual dye from both sides using warm water & mild soap. Gently scrub away any stubborn stains or marks with a soft brush.
- It’s like brewing a colorful potion! Don’t drink it or you might see rainbow unicorns!
Choosing and Mixing the Dyes
- When dyeing discs, selecting the right colors is key to get the desired effect.
- Decide on a color palette, research dyes, and mix them according to instructions.
- Test the colors on a sample first and experiment with diluting the dye for gradients.
- Keep records of your mixtures for future projects.
- Clean and prepare the disc before applying the dye, and consider existing patterns or markings that may be enhanced.
- Disc dyeing has been around since Frisbee days and now there are many techniques and materials for creating unique designs on discs.
- Get ready to make your disc look as vibrant as your questionable life choices!
Applying the Dye to the Disc
When it comes to disc dyeing, applying the dye is essential. There are many techniques to choose from for this step.
- First, make sure the disc is clean and free of dirt. This helps the dye stick.
- Select and mix dyes for your design. Techniques like shaving cream, spin dye, ice dye, adhesive vinyl decal/stencil, hot glue design, splatter/drip design, and cloth design all work differently. Learn them before starting.
- Once the dyes are ready, apply them. Shaving cream or spinning the disc in a dye-filled container are two methods. Follow instructions to get the best results.
- Let the dye set for the right amount of time. Patience is key here.
These steps will help make your disc unique.
For some methods, you may need extra care. Placing decals or stencils precisely is vital for clean lines. Hot glue designs require careful application to create patterns.
One person learned this lesson the hard way. They tried the shaving cream method but smeared the dye before it set. Despite this mistake, they persevered and created stunning designs later. Patience and attention to detail are important for desired results.
Allowing the Dye to Set
To get the dye to stick to the disc, it’s important to give it time to set. This allows the dye to penetrate the plastic, creating a permanent bond for vibrant and lasting designs.
A 5-Step Guide for Allowing the Dye to Set:
- Put the disc in a bag or cover with cling film to prevent smudging or contamination while the dye sets.
- Place the disc on a flat, level surface and leave it undisturbed during the setting period. The time can vary based on the dye and environmental factors like temperature and humidity.
- Avoid touching or disturbing the disc, as it can mess up the bonding process.
- Put the disc at room temperature or follow instructions for heat-setting techniques.
- After the setting time is over, remove the covering and rinse under cold water. Don’t scrub too hard, as it can damage the design.
Additional Details:
Giving the dye time to
Follow these steps and you’ll be sure your disc will keep its vibrancy even after playing disc golf. Clean and finish the disc after dyeing, just like your ex-boyfriend’s car that you keys.
Cleaning and Finishing the Disc
Cleaning and finishing a disc is essential for the dyeing process. After applying dye and allowing it to set, it’s important to clean it properly and give it a polished finish. To do this, follow three steps:
- Remove excess dye: Rinse the disc with water and scrub gently with a brush or cloth.
- Dry the disc: Pat it dry with a towel or air dry. Avoid heat sources like hairdryers.
- Apply a protective coating: Spray a thin layer of clear acrylic spray paint onto the disc. Let it dry completely before use.
Additionally, handle the discs carefully when cleaning to avoid smudging and damage. Use quality dyes that are fade-resistant and suitable for discs. For a more thorough cleanup, use mild soap and warm water, and polish with toothpaste. Store the dyed discs in a cool and dry place away from direct sunlight when not in use. This will ensure your designs remain vibrant and long-lasting.
Tips and Considerations for Disc Dyeing
Dyeing a disc golf disc can be an exciting way to customize your disc and make it stand out on the course. Here are some tips and things to consider:
- Choose the right type of dye. There are various options, such as RIT dye or disc-specific dyes. Research which one is suitable for disc golf discs.
- Prepare the disc before dyeing. Clean it thoroughly and lightly sand the surface for better adhesion.
- Use stencils or templates to create intricate designs on the disc. This can help you achieve more professional-looking results. You can also use multiple layers of dye for vibrant and detailed designs.
- Follow instructions and safety precautions with your chosen dye.
Now you can dye your disc golf disc and create a unique and personalized piece of equipment for your game.
Conclusion
The reference data on how to dye a disc golf disc offers a great resource for disc golfers who want to customize their discs. It covers the selection of the appropriate disc, preparing the dyeing solution, applying the dye design, and concluding with a sealing process. These instructions let players unleash their creativity and make unique, vibrant works of art.
Sarah, a disc golfer, shared her experience. She used the stencil dyeing method to make an intricate geometric pattern. She was happy with the results, and it became a talking point at tournaments. Her story shows the effectiveness and accessibility of the techniques described in the reference data.
In summary, the reference data gives disc golfers the knowledge to transform their discs into something special. With these instructions, they can create designs that make their disc golf experience more enjoyable.
Some Facts About How To Dye a Disc Golf Disc:
- ✅ The shaving cream method is an easy and affordable way to dye disc golf discs. (Source: Team Research)
- ✅ The spin dye method is a fun and unique way to dye discs. (Source: Team Research)
- ✅ Synthetic fiber dyes, such as Jacquard’s iDye Poly and Rit Synthetic Dye, are recommended for disc dyeing. (Source: Wikihow)
- ✅ It is important to follow safety precautions, such as wearing gloves and using proper containers for dye mixing. (Source: Team Research)
- ✅ Different disc plastic types hold dye differently, with softer plastics like Pro or Elite X being easier to dye and holding dye better than harder plastics like Champion and Elite Z. (Source: Disc Puttheads)
FAQs about How To Dye A Disc Golf Disc
1. How can I dye a disc golf disc using the shaving cream method?
To dye a disc using the shaving cream method, cover a flat surface with shaving cream, add dye to the shaving cream, draw a design with a toothpick or skewer, place the disc on top of the shaving cream, let it sit for 10-15 minutes, remove the disc and scrape off the shaving cream, rinse the disc with water, and let it dry.
2. What are the steps for using the spin dye method to dye a disc golf disc?
To dye a disc using the spin dye method, create a stencil of your design, place it on the disc, mix dye with water in a squirt bottle, place the disc on a motorized turntable, spin the disc, apply the dye mixture with a paint brush while the disc is spinning, let the dye sit for several minutes, rinse the disc with water, and let it dry.
3. Which dyeing method should I use for a tie-dye effect on my disc golf disc?
The shaving cream method is a great choice for creating a tie-dye effect on your disc golf disc. By adding multiple colors and swirling them together in the shaving cream, you can achieve a unique tie-dye design.
4. What type of dye should I use for disc golf discs?
For dyeing disc golf discs, it is recommended to use synthetic fiber dyes, such as Jacquard’s iDye Poly and Rit Synthetic Dye. These dyes are designed to set into the plastic of the discs and provide vibrant colors.
5. How do I remove stamps from a disc golf disc before dyeing it?
To remove stamps from a disc golf disc, you can use rubbing alcohol, acetone, or brake cleaner. Apply the chosen solution to a cloth or paper towel and rub the stamp until it is removed. Take caution not to damage the plastic of the disc.
6. Are there any safety precautions I should take when dyeing disc golf discs?
When dyeing disc golf discs, it is important to wear gloves to protect your hands. Additionally, use proper containers for dye mixing and cover surfaces to avoid staining. Following safety precautions will ensure a safe and enjoyable dyeing process.